Sunday, May 31, 2009

Kadai Paneer

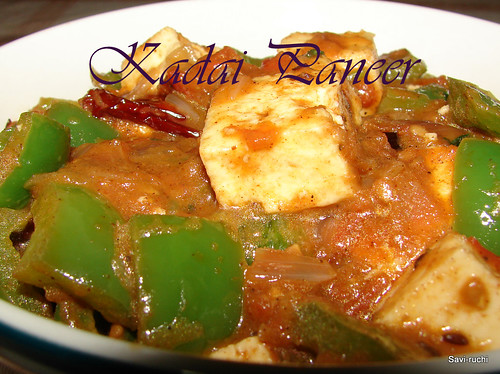
This dish is a must entry in the menu card of most of the restaurants serving Indian food(Not sure about their kitchen though!!).The question is how many restaurants serve the authentic kadai paneer? Can we recall a restaurant where we can proudly say, I had the best kadai paneer there. The sad note is, restaurants quoting “Authentic Punjabi Food” also fail to give tastier kadai paneer. As I understood from a friend of mine, kadai paneer is prepared by adding freshly powdered green cardamom, bay leaf, coriander seeds, and red chillies to get an authentic taste. But, most of the restaurants seem to use the same creamy gravy (oily!) prepared for other dishes & just throw in vegetables required.
What I want to say all kadai paneer lovers is, “Don’t go by the name, by the ingredients or by the fancy name”. This dish does not require any special ingredient & is very easy to cook. So, cook it at home & enjoy the dish. It tastes so authentic that you can fool people by saying you put hours together to prepare this delicious dish. Same happened to me few years before. I prepared it during my hubby’s relative’s visit & it was a big hit at our family. Many of my aunties, cousins took the recipe from me & all started cooking it. It had become my signature dish for couple of months. The highlight of Kadai Paneer is “the crunchiness of capsicum & softness of cottage cheese with lightly infused gravy”


Ingredients:
Indian Cottage Cheese: 200gms (Cut into ½ inch sized cubes)
Green Capsicum: 2 nos (Cut into ½ inch sized squares)
Tomatoes: 3 nos
Onion Paste: 2tbsp (I added finely chopped onions here)
Garlic: 3 pods (minced)
Coriander Seeds: 1tbsp
Coriander powder: 1 tsp
Red Chillies: 2 nos
Red chilli powder: ½ tsp
Garam Masala: ½ tsp (optional)
Bay leaf: 1 no
Green cardamom: 2 nos
Oil: 2 tbsp
Butter: 1 tbsp
Cumin Seeds: ½ tsp
Salt: According to taste

Method:
  • Blanch the tomatoes & chop them into small pieces.
  • Make a coarse powder coriander seeds & red chillies.
  • Heat oil in a broad pan, when oil is hot, add cumin seeds, followed by coarse powder of coriander & red chillies. Saute it for 30secs. Add onion paste & garlic. Saute till garlic turns golden brown. Add the tomatoes, little salt, red chilli powder, bay leaf & cook the tomatoes on a low heat for 15-20 mins.
  • Meantime, heat the butter in another pan, when butter is hot, add coriander seeds powder followed by paneer cubes, sauté the cubes for 1-2 minutes. Then add capsicum & sauté on a medium flame for 3-5 until the capsicum is cooked & yet maintain its crispness.
  • When the tomatoes start leaving out oil & are cooked till soft, add whole cardamom & garam masala. Saute for another 3-5 minutes on low heat.
  • Remove the bay leaf, cardamom from the gravy before serving. Add the sautéed capsicum & paneer 10 minutes before serving the dish for paneer to absorb the gravy.
PS:

  • The main idea is to keep the capsicum crisp & paneer firm. Hence, donot keep capsicum & paneer in gravy for a long time. The paneer gets crumbled & capsicum becomes soft.
  • Do not try to skip, the addition of whole cardamom as it adds a nice flavor to the dish.

Blog Events: Goes to "MFT:Cheese" event hosted by Poornima Nair of Tasty Treats & to Bindiya who originally started the event.

Thursday, May 28, 2009

Peperonata: Pasta in Sugary-Peppery Sauce

Once upon a time, the name pasta was enough for me to skip the office party, as I used to hate it. May be I never felt like giving a try because of the ‘not so usual’ shapes of pasta & also because I tasted it at a wrong place first time. My first experience with pasta was in one of the restaurants in Central Mall, MG Road, Bangalore. It was pathetic. After that, I avoided all pasta parties. I repent my decision now after tasting delicious pastas here. I see a whole lot of change in myself within a year. I have not only started eating pastas, but started experimenting at home too.

All food bloggers love to blog hop. I’m not an exception to that; however my blog hopping is limited. My hubby takes control over my blog hopping & does not let me do it for more than 10 minutes. So, I always forget to bookmark the wonderful dishes that I dream to cook someday. One such recipe that I wanted to try from sometime was this pepperanata. I found this simple & delicious recipe at Madhuram’s place. I made few modifications to suit my needs & cooked it couple of weeks before. The sugary-peppery sauce with cheese makes you crave for third & fourth helping too. Thanks a lot for the nice recipe Madhuram.


Ingredients: (Serves 3)
Pasta: 250gms (I used whole wheat penne)
Yellow capsicum: 1 cup (cut into strips)
Green capsicum: 1cup (cut into strips)
Onion: 1 medium to big sized (sliced)
Green chilli: 2 nos (slit into 2)(Original recipe didnot have this)
Garlic: 4 pods (minced & finely chopped)
Sugar: 1 tbsp
Salt: According to taste
Pepper powder: 1tbsp
Parmesan cheese: 4 tbsp
Tomato: 2 nos (discard seeds, pulp & cut into strips) (Original Recipe didnot have this)
Water: 1/4th cup
Pasta Herbs: 1 tbsp
Olive Oil: 2 tbsp


Method:
  • Cook the pasta until soft by following the package instructions.
  • Add oil & salt while cooking. Drain the water & preserve some water to be used while sautéing the vegetables.
  • Heat a broad pan, add oil to it. When oil is hot, add minced garlic, and fry till it turns golden brown.
  • Add, onion, capsicum, water & cook it on a high flame for 2-3 minutes.
  • Reduce the flame, add sugar, pasta herbs & cook the capsicum, onions on a medium to low flame for 10-15 minutes.
  • Throw in the tomatoes & cook again on high flame for 1 minute only.
  • Add cooked pasta, salt, pepper powder, cheese & toss them well. Serve it hot/warm with a bread of your choice.

PS:
  • If available, use cherry tomatoes instead of tomato strips.
  • I followed Madhuram’s suggestion & did not skip the sugar. She was right, addition of sugar takes this pasta to a different level altogether.
  • I strongly recommend you to add cheese (this was not in the original recipe) as it blends quite well with the “sugary-peppery” sauce. However, you can be flexible on the quantity of cheese.

Update: Goes to MFT:Cheese hosted by Poornima Nair of tasty treats & started by Bindiya.

Tuesday, May 26, 2009

Garlic Bread (Microwave Version)

This starter played a major role in increasing the BMI of me & my hubby. We used to crave for Pizza Hut’s garlic bread. Aha!! It used to be lip smacking. My hubby knew my craving for garlic bread & he used to make sure we eat it at least once a week during my pregnancy days. I remember eating 1 & ½ portion (1 portion => 4 slices) of garlic bread with cheese 2 days before my delivery too ;)


I had almost forgotten the taste of garlic bread after I moved here. Recently, on one of the lazy saturday afternoon’s, I started looking for garlic bread recipe & I found something interesting here. I gave a try, but did not have high expectations as I did not have an oven & had to compromise with the microwave. It did not come out very well since I used more garlic & the end result became a little bitter. I tried 2-3 times again with small portions until I was happy with the result. However, it would taste better if baked in an oven, but microwave was also not a bad idea :)


Here is my first tried version of garlic bread. I served this with pasta.

Ingredients:
Baguette: 1/2 loaf
Mixed herbs: 1 small pinch on each slice
Margarine: 5 tbsp
Garlic: 3 pods
Salt: A pinch

Method:
  • Slice the baguette into 3/4th inch slices.
  • Roast the garlic on a medium flame till raw smell of garlic disappears & it turns slightly brown. Allow it to cool.
  • Grate the garlic or prepare a paste out of it, mix the garlic with margarine. Add salt, mix well.
  • Spread a pinch of herbs on the sliced baguette & spread the garlic butter/margarine generously over the slice.
  • Arrange it in a microwave safe tray & bake it for 8 minutes.
  • Allow it cool & serve the garlic bread with any dip or with pasta of your choice.


PS: My microwave does not have temperature indications on it. I tried 2 slices first by keeping it in medium power for 5 minutes. The crust became very hard. Hence, kept it on medium for 2 minutes & 6 minutes on low power. It turned out good. Hence, be prepared to perform few trials until you get a hang of your microwave.

Saturday, May 23, 2009

Set Dosa with Vegetable Saagu

I did not know the real taste & meaning of set dosa until I came to Mysore. Mysore is a historical capital of Karnataka. It is famous for its palace (popularly known as Mysore Palace), the very reputed university (University of Mysore), Dasara festival celebrations, KRS dam (Krishna Raja Sagar) , Chamundi Hills & new additions like GRS Fantasy Park, Karanji Lake etc. There is a famous song describing the various spots in Mysore. People who can understand Kannada could listen to & see the song at youtube. It is also famous for silk. Who doesn’t know about the very famous 'Mysore Silk Sarees'. They are so light & pleasant to put on with absolutely pleasing colours.
Apart from these, it is also famous for its food. Oh!!, the different types of roadside churmuris, Mysore Masala Dosa, Set Dosa & Mysore Pak. All Mysoreans would have their own preferences for relishing their masala & set dosas. The most popular spots being, GTR in Chamundipuram, Mylari hotel for tatte idli (plates are used as moulds to prepare idlis), Raju hotel in Ramanuja Road, Paras for chats & other sweets in Sayyaji Rao Road, Nalapak Group of Resturants in various localities & Penguin to relish varieties of ice creams. I am becoming nostalgic now & I can write pages together as I love Mysore so much.
Let me come back to set dosa before my eyes get wet. It is known as set dosa because, 3 identical & extremely soft dosas are placed one above the other on a banana leaf, topped with some generous butter & served with 1 cup of vegetable saagu(vegetable curry) & 1 cup of coconut chutney. The aroma from the plate makes you jump over it immediately.
This recipe mentioned below is a close match to the one served in restaurants, my hubby always compliment me saying “it is very similar to restaurant served set dose”. Do try it & get complimented by your loved ones. It boosts your energy levels :p
You can see the vegetable saagu recipe here.


Ingredients:
Idli rice/Parboiled rice: 1.5 cups
Broken rice/Normal rice: 2.5 cups
Urad dal: 1 cup
Beaten Rice/Avalakki/Poha: 1/2 cup
Salt: According to taste
Sugar: a generous pinch
Yogurt/Curd: 1/4th cup
Other ingredients:
Oil: 1/4th tsp to grease each dosa

Method:
  • Wash the rice & urad dal several times in water. Soak the rice & dal together for 5-6 hours.
  • Wash the beaten rice thoroughly & soak it in yogurt for 5-6 hours.
  • Blend the rice, dal & beaten rice together to form a smooth batter. Batter should be like thick milkshake.
  • Scoop the batter in a broad vessel, close the lid & keep it in a warm place for 8-10 hours to ensure proper fermentation. Batter would be doubled after 10 hours.
  • Add salt, sugar to the batter, mix well.
  • Heat the griddle, pour a ladle full of batter on to the hot griddle & spread the dosa batter gently. Donot spread the batter more as the dosa needs to be thick & shall look a pancake. Pores start forming on the dosa as shown below.


  • Now, close the lid of the griddle & cook the dosa covered. Open the lid after 30secs, turn the dosa & cook it on the other side.

  • Prepare 2 more such dosas &set dosa is ready to be served with saagu or chutney.

Wednesday, May 20, 2009

Thondekayi Saasime/Saasive (Ivy Gourd in Yogurt Sauce)

Thank you all for your inspiring words, mails & suggestions. I am back to normal now. I was home sick missing my parents, sister, brother & all the loved ones. This is the first time, I stayed away from them for such a long time. I called my mom, sister & all my loved ones; spoke to them many times over the last two weeks & now, I have got all my energy, enthusiasm back.

BTW, Don't you think I have given an overdose of yogurt recipes? By now, most of you must have known my affair with yogurt/curd. Be it a simple curd rice or a yogurt mousse, I absolutely love yogurt dishes. Hence, I love preparing, eating & blogging more & more yogurt based dishes like tambli, saasime, hashi etc.

Now, lets talk about ivy gourd; "bhendekayi buddivardaka, thondekayi buddinashaka" is a saying in Kannada. It's loose translation is, "okra helps in building one's intelligence while ivy gourd is converse of the above". I donot know how true is the above statement, but I know of few families who donot cook ivy gourd just because they have heard about this. Poor guys!!In our family, all of us love ivy gourd; so, I normally prepare this 'saasime' very frequently. So far, I think, the effect of eating this are not visible yet :)

Ingredients:
12-15 ivy gourd/ thondekayi
1tsp urad dal
1/4 tsp mustard seeds
1/4 tsp jeera/cumin seeds
1 big pinch turmeric
1 big pinch tamarind powder/amchur powder
1/2 cup curd
3 tbsp grated coconut(fresh/frozen)
1 green chilli (finely chopped)
1 broken red chilli
salt according to taste
2 tsp cooking oil

Method:
Wash the ivy gourd & chop them into very thin slices as shown below.

Add the oil to a broad kadai, when oil is hot, add urad dal.
When urad dal becomes golden brown, add sliced ivy gourd(sliced) & fry it in oil until crisp (takes around 6-8minutes).
When the ivy gourd is 3/4th done, add salt, amchur powder & continue to stiyfry the vegetable. Remove from flame & allow it to cool.

Make a fine paste of grated coconut, turmeric & mustard seeds. Add this paste, finely chopped green chilli, curd & salt to the cooled bendekayi. (Adjust salt accordingly as salt is added while stir-frying the vegetable)
Prepare the tempering. Add oil to a sauce pan, when oil is hot, add cumin seeds, when cumin seeds splutter, add broken red chilli, asafetida, curry leaves & pour this tempering to the saasime prepared.
Thonde saasime is ready to be served with rice or roti.


Award:
Smitha of Saffron Apron has passed me this beautiful award. Thanks a lot for the award Smitha.


Events:


Friday, May 15, 2009

Paneer Koftas in Malai Gravy(Cottage Cheese in Creamy Sauce)

Did I win any cash prize? Did I get a salary hike? Is there any special occasion? Are guests coming? No, No, No. Then why on earth I need to cook such expensive dish at home? This is the inner feeling I get whenever I decide to prepare some North Indian gravies made out of cream, butter or cashews.

If you need to know the reason behind that, continue reading. During our college days, we used to literally crave for good food as most of us were staying away from parents. The cheap & best option that we found was the Bangalore-Mysore Highway dhabas. The not-so-clean, roadside dhabas served awesome food at unimaginably low price. We used get a dal tadka for 12 rupees, dal makhni for 20 or so. Normal tandoori roti was served at 2 rupees. We, a batch of 6-8 friends used to wait for the city bus running beween Mysore to Srirangapatna , stop at “Delhi Choice Dhaba” & start hogging. We used to share the expenses later. Hence, all used to keep a close watch on the menu card. We never used to order malai kofta, paneer kofta, paneer tikka & other dishes, as the price of the side dish used to be close to 30 rupees. We all were so stingy then :)

Nevertheless, when we got a chance to get treated for birthday, we used to order all such expensive dishes to increase the bill. Not only that, guys used to go for a walk in-between meal to ensure the food is digested. After their walk, they used to order some more dishes or desserts, phew!! Shameless people. Whatever it is, we all thoroughly enjoyed our graduation days to the maximum & they are cherished forever.

The price of the kofta curries is so much imbibed in my mind that even now I start thinking about the expenses involved in preparing this dish. These days in addition to the expenses I think of another number i.e. calories intake. Poor me!!

Translations:
Malai : Cream
Paneer : Indian Cottage Cheese
Gravy: Sauce

Ingredients:
For koftas:
1 cup paneer/cottage cheese grated
1 cup mashed & boiled potato
1/4th cup green peas (boiled)
1/4th cup grated carrot
4-5tbsp corn flour
1 tsp lemon/lime juice
1 tsp garam masala
½ tsp chat masala
½ tsp cumin seed powder
1 bread slice
Salt according to taste
A pinch of sugar (optional)
Oil for deep frying

For gravy:
2 medium sized onions
3 tomatoes (blanched & pureed)
1 tsp garlic paste
3/4th cup heavy cream (whipping cream)
1 tsp kitchen king masala (Thanks to Sia of Monsoon Spice for this special ingredient)
1 tsp red chilli powder
1 tsp coriander seeds powder
2 tsp kasoori methi (dried fenugreek leaves)
½ tsp garam masala (optional)
8-10 cashew nuts soaked in water/milk
1 tsp poppy seeds
2 tbsp cooking oil

Method:
For koftas:
  • Dip the bread slice in water for a second, squeeze out the water completely & mash it thoroughly.
  • Mix all the ingredients mentioned for koftas (except oil) along with the mashed bread slice in a large boil. Make lemon sized balls out of the mixture.
  • Heat oil in a broad pan, when oil is hot, deep fry the balls on a slow flame. Keep turning the koftas as it turns brown very fast.
  • When koftas turn golden brown, remove it from oil & drain excess oil by keeping them on an absorbent paper.

For creamy sauce: (Cooking time : 20-25mins)
  • Finely chop the onions & keep them aside.
  • Prepare a paste from the soaked cashew nuts & poppy seeds.
  • Heat oil in a broad pan, when oil is hot add finely chopped onions & saute it on a medium flame until it is completely soft & slightly brownish (takes around 5 minutes)
  • Add garlic paste & saute again. To this, add blanched tomato puree, kasuri methi & cook it on a slow flame for 3-5 minutes.
  • Add coriander seeds powder, salt, red chilli powder, kitchen king masala, cashew-poppy seeds paste & cook on a slow flame (2-3 minutes)
  • Finally add cream, garam masala & boil the sauce for another 5-7 minutes.
Serving:
  • On a serving dish, add the gravy prepared & place the koftas in the gravy.
  • Serve it hot with roti, naan or kulcha.

Note:
  • Deep fry the koftas on a very slow flame as it turns brown very fast.
  • While sauting the onions for gravy, cook on a medium flame until it becomes soft & ensure it doesn't turn brown. (If onions become brown or gets charred, the malai gravy becomes a little bitter & wont get that sweetness)
  • Tomato flavor shouldnot become prominent in this gravy, hence blanch the tomatoes before preparing the puree.This would remove the raw smell of tomatoes.

Tuesday, May 12, 2009

Rice Dumpling Paratha

Couple of months before, my hubby & son went to India leaving me all alone here. Those days I used to watch Zee Kannada Online for hours together to kill boredom. Unfortunately, the link is no more working. I was lucky enough to view the channel for 2-3 days. Anyways, try your luck with the link, you never know it might start working again :)
I happened to see few innovative recipes in "PRESTIGE RUCHI ABHIRUCHI Area Queen" Contest (one of the popular programs in Zee Kannada). One such recipe is this akki mudde paratha or rice dumpling paratha(I donot remember the actual name of this dish, I named the dish as rice dumpling paratha).
The idea was new because we normally prepare ukkarisida akki rotti (rice flour Indian bread) & godi chapathi(wheat flour Indian bread) seperately. It is nice to fill rice flour mixture into chapathi(wheat flour dough) & prepare this new dish. I added a dash of fenugreek leaves, garam masala, amchur powder to make the stuffing more interesting (this was not in the original recipe list). The end result was much above my expectations. My husband could not even imagine the kind of stuffing done. He was thinking it to be potato or paneer :p

Ingredients:
For stuffing:
Rice flour: 1 cup
Water: 1.75 to 2 cups (depending on the rice flour used, add 2 cups if rice flour is made from boiled rice)
Methi leaves/fenugreek leaves: 1/4th cup (I used 4 cubes of frozen methi)
Garam Masala: 1 tsp
Chilli powder/paprika: 1 tsp
Amchur powder: 1/2 tsp (optional)
Salt: According to taste

For dough:
atta/wheat flour: 2 cups
Curd/Yogurt: 3 tbsp
Warm water: For mixing the dough
Salt: according to taste
Hot oil: 1 tsp (optional)

Method:
For stuffing:
  • Bring water to a boil, when water starts boiling add rice flour & salt. Donot disturb the flour, the rice flour starts floating & forms a single mass in the center of the boiling water. Cook it on a slow flame for 7-10minutes. Turn off the flame.
  • Gently mix the cooked rice flour with water. If small lumps are formed, don't worry, it can be kneaded later.Allow the mixture to come to normal temperature.
  • Add finely chopped fenugreek leaves, amchur powder, garam masala & red chilli powder to the cooked rice flour mixture & knead the mixed flour for 5-10 mins. The complete mixture must become like a single mass & will be similar to wheat flour dough (Note: rice flour dough will be softer than wheat flour dough)
  • Prepare lemon sized balls for stuffing & keep it aside.
For dough:

  • Mix all the ingredients mentioned (for dough alone) & prepare soft dough by adding enough water.Knead it well. Smear oil to the dough & keep it aside for 30mins.
Preparing parathas:

  • Prepare medium lemon sized balls with the dough prepared.
  • Take one portion of the dough, roll it with a rolling pin to a diameter of 4-5inches.
  • Place the stuffing inside & cover it by folding from all directions, ensure it is properly sealed.
  • Dust some dry wheat flour & leave it aside for 1-2minutes.
  • Roll it again carefully to a 7-8inch diameter.
  • Heat a griddle, ensure the griddle is very hot & then cook the parathas on high flame both sides by adding ghee/butter.
  • Serve it hot with curd, pickle or any side dish of your choice.

Thursday, May 7, 2009

Lasooni Baingan Pakoda (Garlicy Eggplant Fry)

A person who is considered as a 'chatterbox, deterministic, energetic' has frozen down all of a sudden without even giving a clue to anyone or to herself. She used to be always filled with dreams, thoughts & now she has filled herself with a complete “VOID”. Before that NULL take over herself, she needs some serious counseling. By now, you would have guessed who the person is.., it is “ME”.
I am in a state that I’m not interested in anything (thank God, I still have interest in cooking :) ). No mood to work, no mood to blog, no mood to anything .., I feel my mind is no more in my control? I have asked myself a hundred times, but I have no answer. Am I homesick? May be.., not sure though. I’m trying my level best to come out of it.

That was an update about myself & now about the recipes. I have a huge backlog of pictures in my camera that needed attention. I have decided not to click any more pictures until I finish the stock. This dish is the oldest of all lying in my draft post since a very long time. So, thought of performing LIFO (Last In First Out) flushing of recipes. This time, I’m directly jumping into the ingredients list.
Ingredients:
Brinjal/Egg Plant: 1 medium sized (use purple colored long ones, Chinese Eggplant)
Garlic Paste: 1 tbsp
Gram Flour/Channa Dal: 3/4th cup
Corn Flour: 1/4th cup
Red chilli powder: 1 tsp
Finely chopped cilantro: 3 tbsp (I skipped this as I did not have stock of cilantro at home)
Salt: According to taste
Carom Seeds (ajwain): a pinch
Baking Soda: a small pinch
Hot Oil: 1 tsp
Oil: For deep frying

Method:
  • Slice the brinjal & soak the slices in very thin buttermilk or water.
  • Mix the gram flour, corn flour, salt, chilli powder, carom seeds, cilantro, baking soda in a broad vessel.
  • Add 1 tsp hot oil, garlic paste to this.
  • Add 1tbsp water at a time & prepare a smooth batter (should be like thick milkshake or like normal dosa batter).
  • Heat oil in a broad pan.
  • When oil is hot, dip the brinjal slices in the gram flour batter (ensure the batter coats the brinjal slice well) & drop it in oil.
  • Fry on both sides till the pakora turns golden brown.
  • Remove the fried pakora from oil & place it on a paper towel.
  • Serve it hot with tomato/chilli sauce or green/mint chutney.

PS:
Garlic paste could be omitted & normal pakoras could also be prepared using the same batter.· I personally feel eggplant blends well with garlic & pakoras become more delicious.

Monday, May 4, 2009

Timare Tambli (Brahmi Tambli)

Here in Singapore, I don’t always get the brahmi leaves. Hence, I have started freezing & storing timare/brahmi/ondelaga leaves for up to a month. I really do not know whether it is good to preserve the leaves for such a long period, but I’m doing this since 2 months & am using the frozen leaves while preparing chutney or tambli. Have a look at my frozen timare.

Brahmi leaves are very good in improving the memory skills, intelligence level of an individual; relieve stress & helps in the growth of nerve cells. In South Canara, Karnataka, India, people squeeze the juice from this leaves & give the infants (as early as 2 months old infants) 2 drops of this juice, early in the morning. There is a belief among our grand moms that, this juice increases the memory power, intelligence level of the kid. Ever since I knew about this, I have somewhat taken an oath to myself that, I’ll give brahmi leaves to my son once or twice a month. This time, I prepared tambli, using frozen brahmi leaves.

Ingredients:
Brahmi leaves: ½ cup (I used 4 cubes frozen leaves)
Grated coconut: 3/4th cup (fresh/frozen)
Buttermilk: 2 cups (we like the tambli thin like rasam)
Cumin seeds: 1 tsp (optional)
Green chilli: 1-2
Salt: According to taste
Coconut Oil: 1 tsp
Mustard Seeds: ½ tsp
Asafoetida: a pinch
Curry leaves: 4-6
Broken red chilli: 1 (optional)


Method:

  • Grind together the brahmi leaves, grated coconut, cumin seeds, green chilli with little yogurt/curd. Prepare a very smooth paste with this.
  • Mix the buttermilk with the chutney prepared. Add salt & mix well.
  • Prepare the tempering by adding oil, followed by mustard seeds, curry leaves, broken red chilli & finally asafoetida/hing. Pour this tempering over the tambli prepared. Refrigerate it & use it within the next couple of hours with rice, pickle or papad.

Steps followed to freeze brahmi leaves:
Wash the leaves thoroughly, include the tender stem. Add very little water & prepare a puree out of the leaves.Pour the puree to the freezing tray.Once brahmi cubes are formed, store the cubes in the ziplock bags for up to a month.

One more brahmi recipe can be found here at my blog.

Featured Post

Noodles and Vegetables with Honey Ginger Sauce

Am I the only one who crave for noodles when sick with cold and sore throat? I love this noodles with honey-ginger sauce and it is perfe...