Saturday, May 29, 2010

Sabbakki Rotti(Sago Indian Bread)

Lakshmi shared this recipe with many of us. I also saw an interesting version of it in Veni's blog. Thank you both. I mixed both the versions & made my own :)
If you give one such rotti to your child, you will be relieved for the day, b'cos this has the carbohydrates, protiens, essential fatty acids & fiber. Isn't this a perfect menu for brunch or breakfast?


Here is my version of the same.

Ingredients:

Sago/Sabudana/Sabbakki : 1.5 cups
Rice flour: 1 cup
Potato: Approximately 1 cup (boiled &mashed)
Peanuts:1 tbsp (roasted & coarsely crushed)
Spinach leaves: Approximately 3/4 to 1 cup (finely chopped)
Salt:According to taste
Green chilli paste: 1/2tsp (optional, I normally donot add this)

Other ingredients:
Oil: 1 tsp or more for each rotti.

For patting the rotti:
Wax paper/brown paper/aluminium foil: 1 no
Water: 1 cup (to wet the hands)

Method:
  • Wash the sago seeds in water & drain the water immediately. The moisture in the water us sufficient to make the sago soft. Let it rest for 10-15mins.
  • Mix all the other ingredients together. Add the soaked sago too. Add few tbsps of water if needed. Make it a soft dough. 
  • Make medium orange sized balls(the above batter will make around 10 balls).
  • Heat the griddle. Meantime, sprinkle 1-2 drops of oil to the brown paper. Place the batter on the paper & start patting them. Wet your hands in between (this helps in patting the rottis easily).  
  • When the griddle is hot, smear few drops of oil to the griddle & put the brown paper on the griddle.
  • After 5-10secs, slowly take off the brown paper alone. Add 1/2 tsp of oil & cook on slow-medium heat for 1 to 2 mins on both sides.
  • Repeat the process for the remaining rottis & serve it hot/warm with a curry/chutney/dip of your choice. 

                                 (I served the rotti with stuffed okra)

Notes:
  • I have used fine variety of sago, hence I did not soak it. If you are using the medium sized sago as she has done, then you need to soak it for 4-5 hours, drain the water & then use.
  • This dish is very forgiving, you can add whatever & how much ever you feel like.
  • If you do not have time to boil the potatoes, grate them & put them. It tastes equally good.
  • Coarsely crushed peanuts could be replaced with the roasted peanut powder.
  • If you donot have the wax paper/brown paper or not confident of using them, try patting the rottis directly on the griddle by cooling them (as shown here).
  • Spinach leaves could be replaced with coriander leaves, grated coconut or any other leafy vegetables of your choice. 

Monday, May 24, 2010

Karibevu Chitranna(Curry leaves rice)

Some information about curry leaves: (Courtesy: Indus Ladies)

Curry Leaves have a special place in Ayurvedic Medicines, because of their many health benefits.

Digestive Disorders: Buttermilk with paste of curry leaves, common salt and cumin seed powder is a common home remedy for digestive upset in Indian Homes. The curry leaves juice is also effective against heartburn.
A paste of these leaves with limejuice and honey/sugar/crystal sugar powder is a time-tested medicine in the treatment of “morning sickness” (hyperemesis graviderum). This paste is also useful for treating excessive vomiting and nausea in pregnant women.

Diabetes: Scientists are finding more about curry leaf – as it contain agents that slow down the rate of starch-to-glucose breakdown in people with diabetes. The curry leaves could control the amount of glucose entering the bloodstream. Ayurvedic research suggests a paste of about 8 to 10 fresh, fully-grown curry leaves is to be taken on an empty stomach in the morning for a minimum of 3 months for controlling non-insulin dependent diabetes mellitus. It also cures diabetes due to obesity, as the leaves have weight reducing properties.

Hair Tonic: These leaves nourish the hair roots. Add twenty leaves to a cup of coconut oil and heat the oil till the leaves turn black. Apply this blackened residual oil to the scalp 2-3 times a week. This oil forms an excellent Ayurvedic hair tonic to stimulate hair growth. This oil stops premature graying.

Herbal Mouth Wash: The fresh curry leaves contain 2.6% volatile essential oils along with chlorophyll, beta-carotene and folic acid, riboflavin, calcium and zinc. All these are excellent for keeping good oral health. Chewing 2 to 4 fresh curry leaves with 10 to 15mls water in the mouth, swishing for 5 to 7 minutes and rinsing the mouth out with water is a great herbal Mouthwash.

Kidney Disorders: Ancient Indian Medicine for kidneys recommends the juice of the curry plant root.
Insect Bites, Burns and Bruises: Curry leaves applied as a poultice can be effectively used to treat burns, bruises and skin eruptions. Fruits of the Curry Leaves with lime juice are used in treating insect bites and poisonous stings.

Some more information can be found here.

Curry leaves are reaching the price of gold in Mysore & Chikmagalur this year, because of some infections to the entire curry leaves tree(both domestic & commercial). My mom who was proud of her tall & healthy curry leaves tree is now running around to get them treated.

I am happy that I get these leaves in abundance here. Infact, if we buy veggies at 
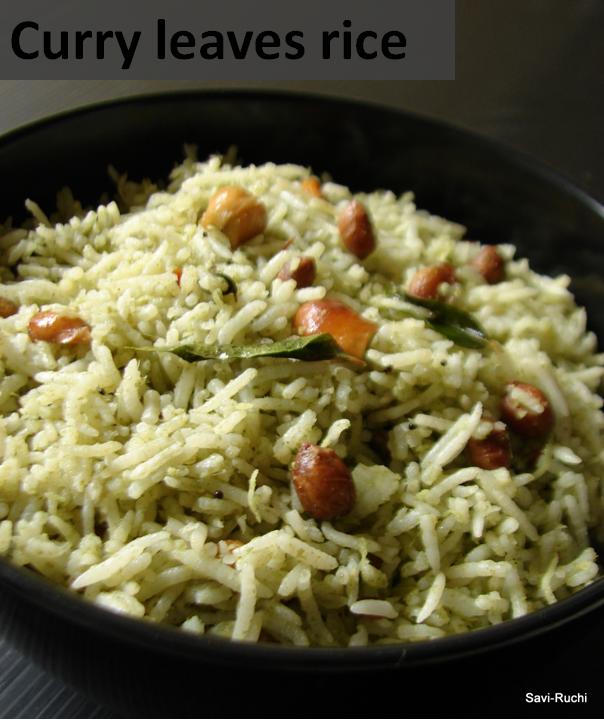
Little India for more than 5-10$, we get these leaves as complimentary gift (Isn’t this a nice word for “free”). On top of that, I have a small curry leaves plant left over by my house owner. During my visit to India last December, I did not forget to learn a handful of dishes that uses curry leaves as the main ingredient. This rice is one of them :) Ever since I have prepared this, it has become a great hit & these days; this chitranna is in my fortnight list. This rice does not call for any special ingredients. It is simple, healthy, easy to prepare & easy to digest too ;)


Ingredients:

Rice: 2 cups (Use any Indian rice of your choice. Do not use sticky rice)
Water: 4 cups
Salt: According to taste
Lemon juice: 2 - 2.5 tbsp

For curry leaves paste:
Curry leaves: 1 cup (tightly packed)
Urad dal/Split & deskinned black gram: 1 tbsp
Green chilli: 4 nos (adjust according to the heat)
Grated coconut: 1 tbsp (fresh/frozen)
Salt: As needed
Sugar: a big pinch (optional, but recommended)

For tempering:
Oil: 2 tbsp
Mustard seeds: 1 tsp
Cumin seeds: 1/2 tsp (optional)
Curry leaves: a string
Turmeric: a pinch
Urad dal: 1 tsp
Peanuts/Groundnuts: 1 tbsp
Chopped cashew nuts: 1 tsp (optional)

For garneshing:
Grated coconut: 2-3tbsp

Method:

  • For curry leaves paste: 
    • Dry roast the curry leaves until all the moisture is removed & the leaves become crisp(the curry leaves could alternatively be sun dried or roasted in oven).Dry roast the urad dal/black gram until golden brown. Allow them to cool. Make a fine paste of curry leaves, urad dal, green chilli, salt, coconut. Add few teaspoons of water to make a paste. Do not add too much water. 
  • Cook the rice & allow it to cool (Left over rice would make the job easy:) )
  • Heat oil in a broad pan, when oil is hot, add mustard seeds, when mustard seeds splutter, add cumin seeds & urad dal. When dal turns golden, add peanuts. Roast peanuts until they are golden brown, follow it by cashew nuts. Add curry leaves & then pour in the paste. Saute until the moisture is gone (for 2-3mins, maximum). Finally, add turmeric & turn off the heat.
  • Spread the rice on a large bowl, add the tempering prepared, salt, sugar, lemon juice, coconut & mix the rice gently. Ensure not to make the rice mushy. 
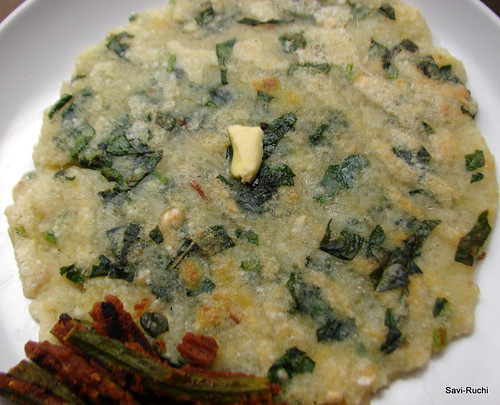
  • Curry leaves rice is ready to be served with a curry/raitha/papad.


Notes:
  • Do not use dark colored curry leaves to prepare this rice as it could become a little bitter. Try to choose, light colored or freshly picked curry leaves.
  • Addition of sugar/jaggery reduces the bitterness of the curry leaves.
  • Curry leaves donot blend well if water is added at the initial stage. Hence, while making the paste of curry leaves, first add the leaves to the mixer jar/spice jar & give it a run(donot add water). Let the curry leaves become a coarse powder, then add all the ingredients & pulse it again to get a smooth paste.
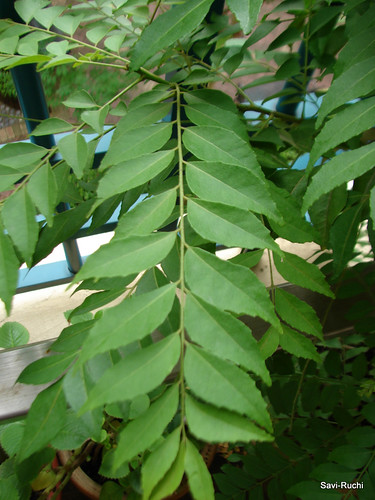
(My curry leaves plant: I love it as they always give such brilliant colored leaves to me!!. This was left by our house owner. I am nurturing it)

Monday, May 17, 2010

Shavige idli (Vermicelli Idli)

The preparation of shavige idli is very similar to the rawa idli/semolina idli. This idli is normally served with bombay saagu(curry) or vegetable saagu(curry).


Ingredients:
Semolina/Rava: 2 cups
Shavige/Vermicelli: 1 cup (I use Bambino or MTR vermicelli)
Buttermilk: 2 to 2.5 cups
Water: Around 1/2 cup (I didnot measure this)
Salt: According to taste
Grated coconut: 1 tbsp
Baking soda or Eno's fruit salt: 1/4 tsp

For tempering:
Oil: 1 tbsp
Cashew nuts: 2 tbsp (broken)
Gram dal/Channa dal: 1 tsp (optional)
Mustard seeds: 1/4 tsp
Curry leaves: 8-10

Method:
  • Dry roast the semolina, vermicelli separately until light brown & allow them to cool.
  • Mix together semolina, vermicelli, buttermilk, grated coconut.
  • Prepare the tempering. Heat oil in a small pan, when oil is hot, add mustard seeds, when mustard seeds splutter, add broken cashew nuts, channa dal/gram dal & saute until they turn golden brown. Add curry leaves & saute for 5-7secs or until curry leaves become crisp.
  • Pour the tempering to the semolina-vermicelli mixture, mix well & keep the batter aside for 30mins.
  • After 30mins, the semolina would have absorbed the buttermilk & the batter would have become dry. Add water & adjust the consistency of the batter (a little thicker than the normal idli batter).
  • Finally add salt, baking soda to the batter, mix well & pour around 2 tbsp of batter to each idli mould & steam the idlis for 20-25mins on medium heat.
  • Serve it hot with a chutney or curry of your choice.


Notes:
  1. Ensure to use a little sour buttermilk to get spongy & soft idlis.
  2. Baking soda could be replaced with same amount of Eno's fruit salt.
  3. Add 1 cup water to 1 cup thick yogurt. Whisk well. 2 cups buttermilk is ready to be used. Keep it outside for 2 hours to make the buttermilk sour.
Other idli recipes here:
Rava Idli/Semolina idli
Mallige idli/Soft idli

Monday, May 10, 2010

Boodu kumbalakai majjige Huli:Type 2(Wintermelon in Yogurt Sauce)

This is one of the oldest posts in my 'drafts' folder. This photo was taken in Jul'09 & the recipe was drafted by my mom-in-law. When she was here, my mom-in-law was so excited about my blog & she wanted her son to publish this recipe (on her behalf) !!!. But, somehow, this activity went on the back-burner. Finally, this recipe is seeing the light of the day. So, here goes the majjige huli (mor kolambu or yogurt curry) from my mom-in-law.

You can see my mom's version here.


Ingredients:
Fenugreek seeds: 1/4 tsp
Winter melon: 2 cups (chopped into 1 inch cubes)
Raw rice: 1 tsp (soaked in water)
Grated coconut: 3/4th cup
Buttermilk: 2 cups (do not use thick yogurt)
Green chilli: 3-4nos (adjust according to your family needs)

For tempering:
Oil: 1 tsp
Mustard Seeds: 1/2 tsp
Cumin seeds: 1/2 tsp
Broken red chilli: 1 no (optional)
Curry leaves: a string
Asafoetida: a pinch

Coriander leaves: 1 tbsp (for garnishing)

Method:
  • Soak the fenugreek seeds in warm water for an hour. 
  • Add 1 cup water, soaked fenugreek seeds to the chopped winter melon & cook the vegetable on a medium heat. The winter melon must be soft yet crunchy (do not overcook the melon).
  • Meantime, make a smooth paste of coconut, green chillies & rice (soaked in water). 
  • Add the coconut paste & salt to the cooked melon. Heat it for 2-3mins.
  • Now pour the buttermilk to the melon mixture & boil the curry on medium heat.
  • Prepare the tempering, Heat oil in a small pan. When oil is hot, add mustard seeds & cumin seeds. When seeds crackle, add curry leaves, broken red chilli & asafoetida. Pour this tempering to the boiling curry mixture. 
  • Finally garnish it with coriander leaves, mix well & serve it hot with rice. 


Tips:
  • For preparing the buttermilk, add 1 cup water to 1 cup yogurt (natural yogurt) & whisk well. 2 cups buttermilk is ready.
  • Be cautious after adding the buttermilk to the mixture. The buttermilk may spill from the container as it comes up.
  • Vegetables like ladies finger, cucumber, chayote squash(chow chow), snake gourd, capsicum can also be used for preparing this dish. 
  • Do not boil this dish many times (as we do for normal sambar). It is best to finish it off when it is fresh. If the dish is left over, transfer it to the fridge immediately & just heat it the next day & consume.
  • Refer here to know more.

Monday, May 3, 2010

Ganji Saaru (Porridge Soup!!)

My mom always calls her mom (ie, my grandmom) whenever we visit her. Reason being, my grandmom can spend time with her children, grand children, great grand children & also we all can relish her cooking (my mom too!). Though my granny is 75+ years old, her zeal for cooking is what I admire in her. She learns & also at the same time shares a lot of dishes. Infact, we both keep exchanging recipes & I do get appreciation from her for my cooking. During these days, my mom hardly cooks as my grandmom would take care of cooking.


So sometimes, I plead my mom to cook as I would want to eat mom-cooked food too. I would have listed few trademark dishes of my mom & would always relish them whenever I visit her, however short my visit is.This ganji saaru is one such dish from my mom & we both sisters used to fight for this rasam. Once in a bluemoon this would be cooked & we would lick our plates clean on that day.


Ganji(Water drained from cooked rice) is needed to prepare this. My mom normally uses white rice(sona masuri rice) & I always do it with brown rice(Kerala rice or Rosematta rice could be used too). Ganji saaru is a very simple & humble dish that cannot disappoint anyone. Enjoy !!


------------------------------------------------------------------------------------
Ganji preparation:

For white rice:
Rice: 1 cup
Water: 3 to 3.5 cups (adjust according to the rice)
   ....OR......
For brown rice or rosematta rice:
Rice: 1 cup
Water: 4 cups

Wash the rice 2-3 times thoroughly in running water. Soak the brown rice (if using) for 30-45mins. No need to do it for white rice. Add water & cook on a low-medium heat until the rice is well cooked & not mushy. Press the rice grain in between your thumb & first finger. If rice gets mashed easily, it is an indication that rice is cooked. Even after the rice is completely cooked, there will be water as more water is added while cooking rice.Drain the water & keep aside. This water or ganji as we call in Kannada is the basic ingredient for the rasam/ssaru. Keep the rice on a low heat for another 1-2mins so that the moisture in the rice is gone. Now, you have rice ready to be consumed with ganji saaru!
-------------------------------------------------------------------------------------


Ingredients for ganji saaru:
Ganji/Water drained from rice: 1 cup (refer above to know how to obtain ganji)
Water: 1/2 cup
Ghee/Clarified butter/Oil: 1 tsp
Red chilli: 2 nos (broken)
Curry leaves: 1 string
Asafoetida: a pinch
Mustard seeds: 1/4 tsp
Cumin seeds: 1/4 tsp
Lemon juice: 2 tsp
Coriander leaves: 1 tsp (finely chopped)


Method:
  • Add salt, water to ganji & heat it again (no need for a rolling boil).
  • Prepare the tempering. Add ghee/oil to a small pan. When ghee/oil is hot, add mustard seeds, cumin seeds. When cumin seeds turn brown, add curry leaves, broken red chillli, asafoetida. Pour this tempering to the ganji. Add lemon juice, coriander leaves & mix well.
  • Serve it hot with piping hot rice & pickle or stir-fry.
Notes:
  • The basic ganji preparation is very similar to the cooking of pasta. However, donot add too much water while cooking rice as the ganji/water drained from cooked rice needs to be thick. If your rice to water ratio is 1:2, make it 1:3 for getting nice ganji. My rice to water proportion is 1:2.5, hence while preparing ganji I make it 1:3.5!
  • The flavor of this rasam/soup could be make garlicy by adding garlic while tempering. If you decide to add garlic, skip asafoetida.
 
Thanks a lot for the good response on my last post. The correct answer is MALABAR SPINACH(Basella alba). Most of you guys have guessed it right !!!

Featured Post

Noodles and Vegetables with Honey Ginger Sauce

Am I the only one who crave for noodles when sick with cold and sore throat? I love this noodles with honey-ginger sauce and it is perfe...